
Systems & sensors
Why Your RV Tank Sensors Are Always Wrong (And What Actually Fixes It)
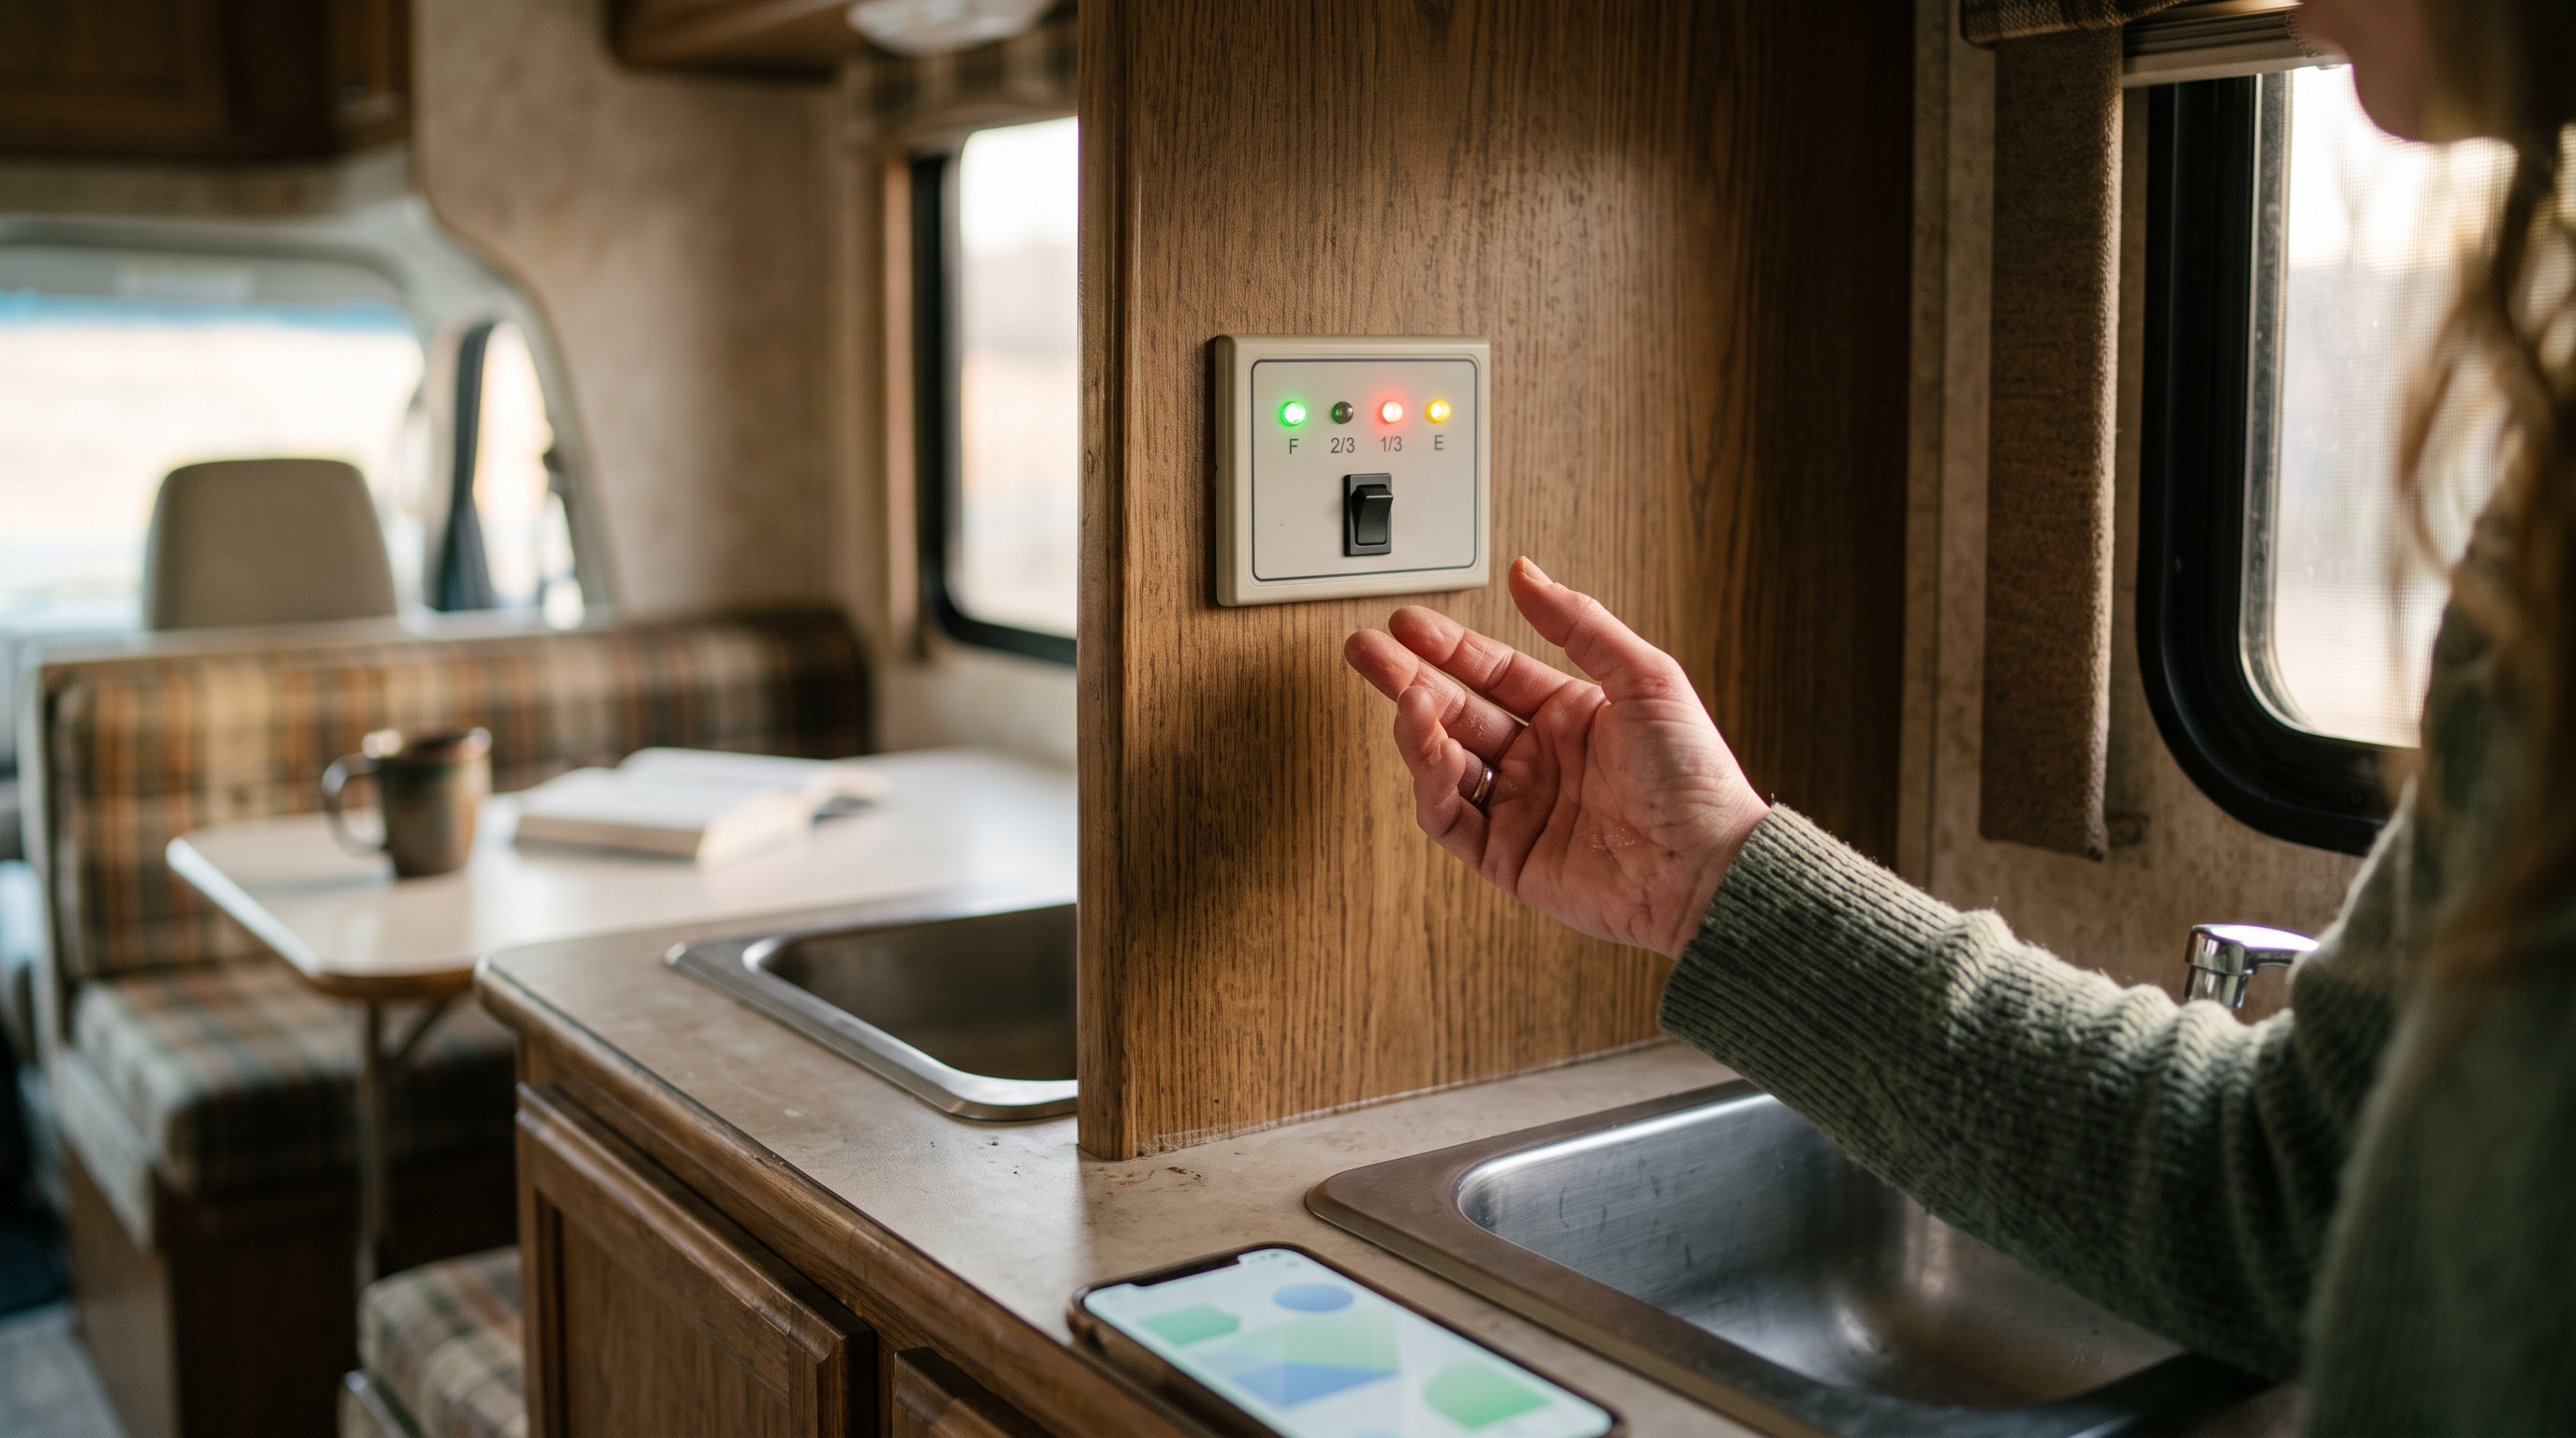
"When the water starts to back up into the shower, I know it's full." — u/Forkboy2 on r/GoRVing, the top-voted answer (38 points) in a thread about cleaning tank sensors
That's not a joke answer. That's the community's actual state of the art — someone asked how to get their sensors reading right, and the most-upvoted reply was use the shower drain as the gauge.
Somewhere right now, an RV tank monitor panel is reporting that the fresh tank is at 13%, the gray tank is at 13%, and the black tank — freshly dumped, rinsed twice, practically ready for surgery — is at 13%. Yours may be that panel. "All tanks read 13%" and "grey tank reads 2/3 full when empty" are recurring forum phrasings — owners quote the numbers from memory because the panel has shown them for years.
The other classic: the black tank that reads 1/3 full for eleven relaxing days, then goes directly to full with no intermediate steps, usually announced by the tank itself rather than the panel. If you've lived that one, you already know why "rv tank sensor not working" gets typed with real feeling.
Here's what the dealer never says out loud: your sensors aren't broken. They were born this way. The factory tank monitoring system in almost every RV uses a sensing method practically designed to fail in a tank full of the stuff RV tanks are full of. This article covers why — then ranks the popular fixes by whether they actually work, because some are real, some are folklore, and one involves driving your sewage around town with a bag of ice in it.
How factory tank sensors work (and why the design is doomed)
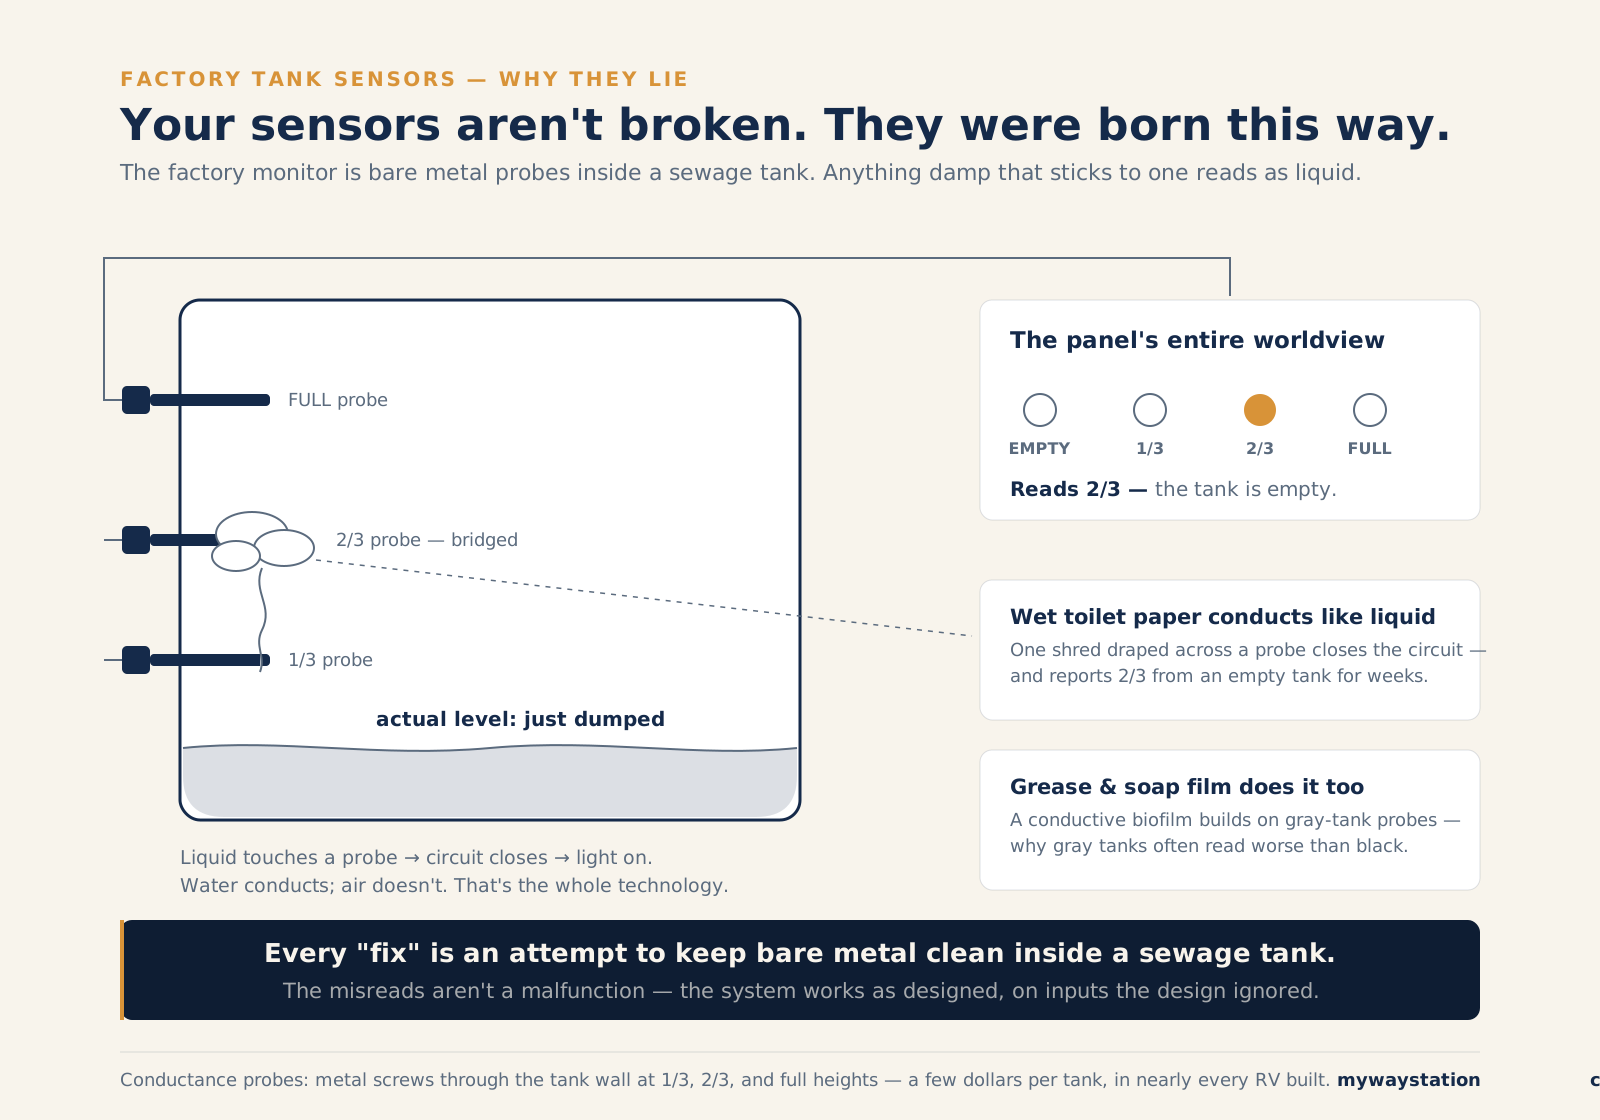
Your monitor panel's entire worldview: three screws in a sewage tank, and anything damp that sticks to one reads as liquid.
The standard system — the one behind that row of lights labeled EMPTY, 1/3, 2/3, FULL — is a set of conductance probes: metal screws or studs punched through the tank wall at different heights. When liquid rises high enough to touch a probe, it completes a small electrical circuit and the corresponding light turns on. Water conducts; air doesn't. That's the whole technology. It dates back decades and costs the manufacturer a few dollars per tank, which is why it's in everything from entry-level trailers to rigs with heated floors.
The fatal flaw: the circuit doesn't care why electricity is flowing between probes. Liquid works. So does anything else conductive and damp stuck to the probe:
- Toilet paper. A wet shred of TP draped across a probe conducts just fine. It will happily report "2/3 full" from an empty tank for weeks. This is the number-one cause of the black tank that reads full forever.
- Grease and soap scum. The gray tank's version of the same disease. Dish grease, soap film, and food particles build a conductive biofilm on the probes. Gray tanks often read worse than black tanks for exactly this reason, which surprises everyone.
- General crud. The technical term the entire RV community has settled on. Struvite, mineral scale, the stuff-of-nightmares coating that builds on any surface inside a holding tank.
Notice what all three have in common: they are normal contents of a holding tank behaving normally. You didn't do anything wrong. A sensing technology that requires clean bare metal was installed in the least clean-bare-metal environment in your entire RV. The misreadings aren't a malfunction; they're the system working as designed on inputs the design pretended wouldn't exist.
Once you internalize that, everything below gets simpler: every "fix" is an attempt to keep metal probes clean inside a sewage tank. Some attempts are better than others.
The fixes, ranked by whether they actually work
1. Probe cleaning with real agitation — actually works (bring a strong stomach)
The only approach that reliably fixes probe misreads is physically getting the crud off the probes. The established methods, in escalating order of effort:
- A tank rinser. If your rig has a built-in black tank flush, use it longer than you think — until the water at the clear elbow runs actually clear, not "clear-ish." No built-in flush? A wand-style rinser that goes down the toilet, or an external reverse-flush attachment at the sewer outlet, puts pressurized water directly against the tank walls and probes. This is the single highest-value tool in this entire article and costs about as much as two tank-treatment jugs.
- The soak. For stubborn buildup: dump, then fill the tank most of the way with water plus a cleaning agent (a dedicated sensor/tank cleaner, or the dish-soap approach below), and let it sit — hours, ideally a travel day, so it sloshes. Then dump again. Repeat. The soak-and-slosh combination is what owner reports credit most consistently.
- Manual cleaning. Yes, some people go in through the toilet with a flexible brush. We admire them. We are not recommending it so much as acknowledging it exists.
Is it unpleasant? It's cleaning a sewage tank; it was never going to be a spa day. But it's the one entry on this list that addresses the actual failure mechanism.
2. Dish soap and water agitation (the "Geo Method") — helps some, oversold by legend
The famous Geo Method — dish soap or laundry detergent plus Calgon water softener in the tank, then drive — has been circulating in forums since roughly the dawn of forums. The theory is that the surfactant loosens grease and the water softener makes tank walls "slippery" so crud can't stick.
Honest read of the evidence: the surfactant plus a mostly-full tank of water plus a travel day part genuinely helps some owners, because that's just a soak with agitation — see fix #1. The Calgon coats your tank in a magic non-stick layer part doesn't hold up; there's no real evidence the softener leaves any protective film, and chemistry-minded skeptics in the community have picked that claim apart for years. So: cheap, harmless, worth doing as a soak — just don't expect the miracle version.
3. Tank chemicals and treatments — marginal for sensors specifically
Enzyme and bacteria-based treatments are legitimately useful for what they're for: breaking down waste and controlling odor. As a sensor fix they're marginal — they act slowly on the tank's contents rather than scrubbing hardened film off a probe, and "the treatment fixed my sensors" reports are confounded by the fact that everyone adds treatment right after a thorough dump-and-flush, which is what actually cleaned the probes. Dedicated sensor-cleaning products (a niche that exists because this problem is that universal) fare somewhat better in owner reports, but inconsistently. Reasonable to try; don't expect much.
4. The ice cube trick — folklore, and it's been tested
The legend: dump the tank, pour a bag or two of ice down the toilet, add some water, and drive. The ice supposedly scours the tank walls and probes clean as it sloshes around.
Someone actually checked. James Adinaro at The Fit RV built a clear acrylic black tank, loaded it with ice and a NASA-grade poop simulant, mounted a camera on it, and drove around. The ice did approximately nothing. It melts fast, it floats on top of the water instead of scrubbing the walls, and whatever mild benefit people report is almost certainly the sloshing water — which you could achieve without stopping for ice. The trick survives because it's fun to tell new RVers to buy a bag of ice for their toilet, which, fair.
Verdict: harmless, festive, ineffective. If you enjoy the ritual, the water sloshing is doing the work; the ice is a garnish.
5. When nothing works — because the fix doesn't stick
Here's the part most articles skip: suppose you do everything right. Full flush, overnight soak, probes gleaming, panel reading EMPTY like a factory-fresh rig. Then you use the RV like a human being for a week, and the gray tank reads 2/3 again.
That's not failure — that's the design reasserting itself. The film comes back, because the tank is still a tank and the probes are still bare metal inside it. Fast-dissolving RV-safe toilet paper (anything that passes the shake-it-in-a-jar test) and plenty of water in the black tank slow the cycle meaningfully. But probe cleaning is a maintenance treadmill, not a cure — and when people say their sensors are "broken," they usually mean they're tired of the treadmill. That's the point where different technology beats more soap.
1. Probe cleaning with real agitation
Flush until actually clear, soak, agitate. The one that reliably works — bring a strong stomach.
2. Dish soap soak (the "Geo Method")
Cheap and harmless; the agitation and water do the work. Oversold by legend.
3. Tank chemicals and treatments
Fine for odor and waste breakdown; marginal for the film on your probes specifically.
4. The ice cube trick
Tested on camera in a clear tank: the ice floats and melts; the sloshing water was doing the work. Harmless, festive, ineffective.
5. Different technology
Cleaning is a treadmill because the film always comes back. External senders (SeeLevel) or sonar (Mopeka) fix the design, not the symptom — compared honestly below.
The upgrade paths, honestly compared
Garnet SeeLevel II — the standard answer, with quirks nobody mentions at checkout
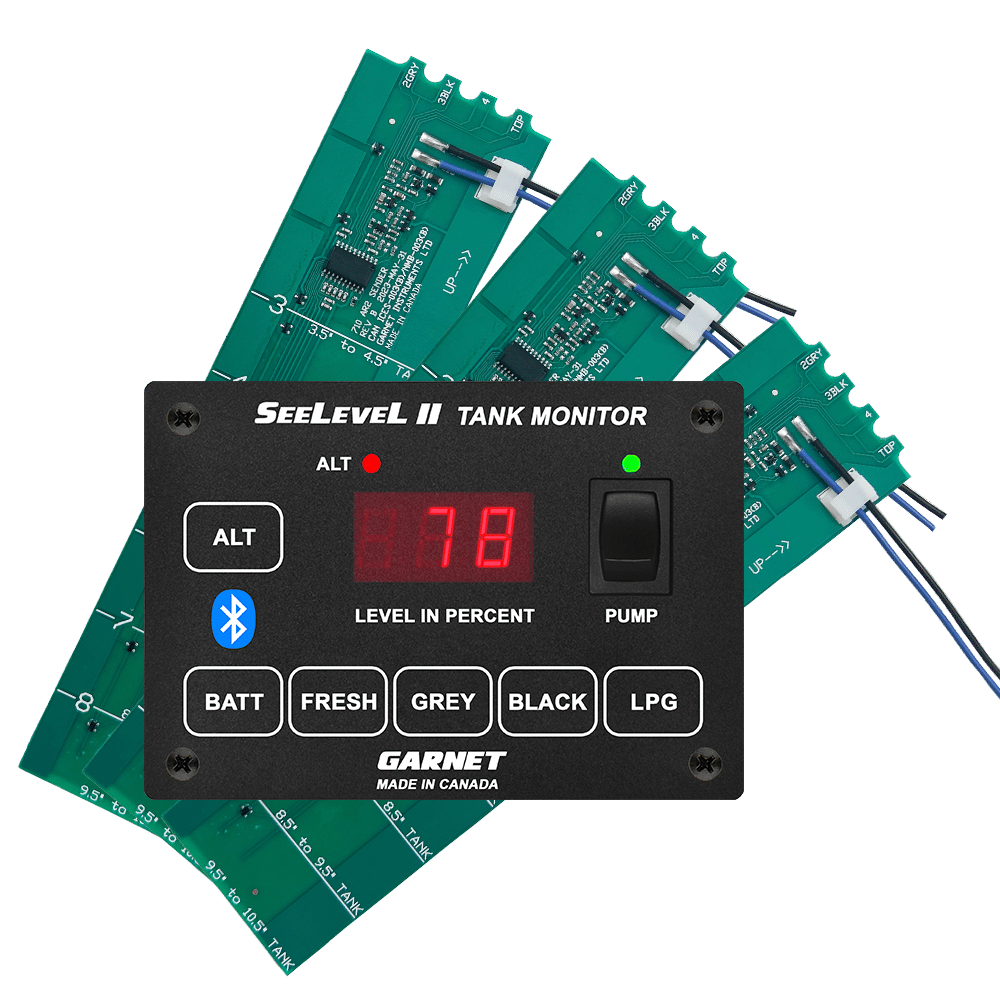
Image: Garnet Instruments, https://www.garnetinstruments.com
Ask any RV forum "how do I fix my tank sensors" and the chorus answers SeeLevel before you've finished typing. The Garnet SeeLevel II is a different technology entirely: adhesive sender strips stuck to the outside of the tank, reading the level through the tank wall as a true 0–100% percentage on a digit display instead of four optimistic lights. (Under the hood the segment resolution is more like 2–5% steps — close enough.) Nothing touches the sewage. Toilet paper cannot bridge a probe that isn't there. It is, deservedly, the default upgrade — typically a couple hundred dollars for a multi-tank kit before installation.
But "default" isn't "flawless," and the forum record is honest even when the marketing isn't — threads like "SeeLevel II Tank Monitor problems" and "Issue with See Level Black Tank Monitor" exist for a reason. Go in knowing:
- It's sensitive to grounding. Garnet's own install manual is emphatic that every sender and the display must share a common ground back to the breaker panel, and warns that RVs "can have several ground circuits with resistance between them" that cause bad readings. Owners who've called Garnet report tech support putting a number on it — as little as ~20 ohms of resistance on the ground path causing erratic readings (owner-reported; Garnet's published manual stresses the grounding requirement but doesn't cite that specific figure). On an RV, where chassis grounds corrode as a hobby, this matters; many "my SeeLevel is broken" threads end with "cleaned up a ground, fixed."
- Metal nearby confuses it. Garnet's manual specifies keeping any metal at least two inches from the sender face (and about an inch from its edges) — frame members, brackets, tank straps, ducts — because metal "can affect the sender reading" much like water does, and installers learn not to mount strips on facing tanks directly opposite each other. On a crowded underbelly, finding clean real estate can take longer than the install.
- Crud hasn't been defeated — it's just moved. A thick residue coating on the inside of the wall where the strip sits can still skew readings; owners report wonky numbers that clear up after a good flush. Sound familiar? Much better than probes, not immune.
- Fit is fiddly. Senders are trimmed to length and auto-calibrate — and stack in pairs for tall tanks, covering roughly 4.5" to 34" — but they have minimum lengths (the SS sender won't work cut below 6"), and hitting a true 0% and 100% depends on careful placement a quarter-inch off the tank top and bottom, so an awkward tank can read a hair off at the ends. Plastic and poly tanks only — the sensing won't read through a metal tank.
None of this dethrones SeeLevel — it's still the answer we'd give. It just assumes decent 12V hygiene and a careful install, not a sticker-and-forget miracle.
Mopeka sonar sensors — the Bluetooth underdog
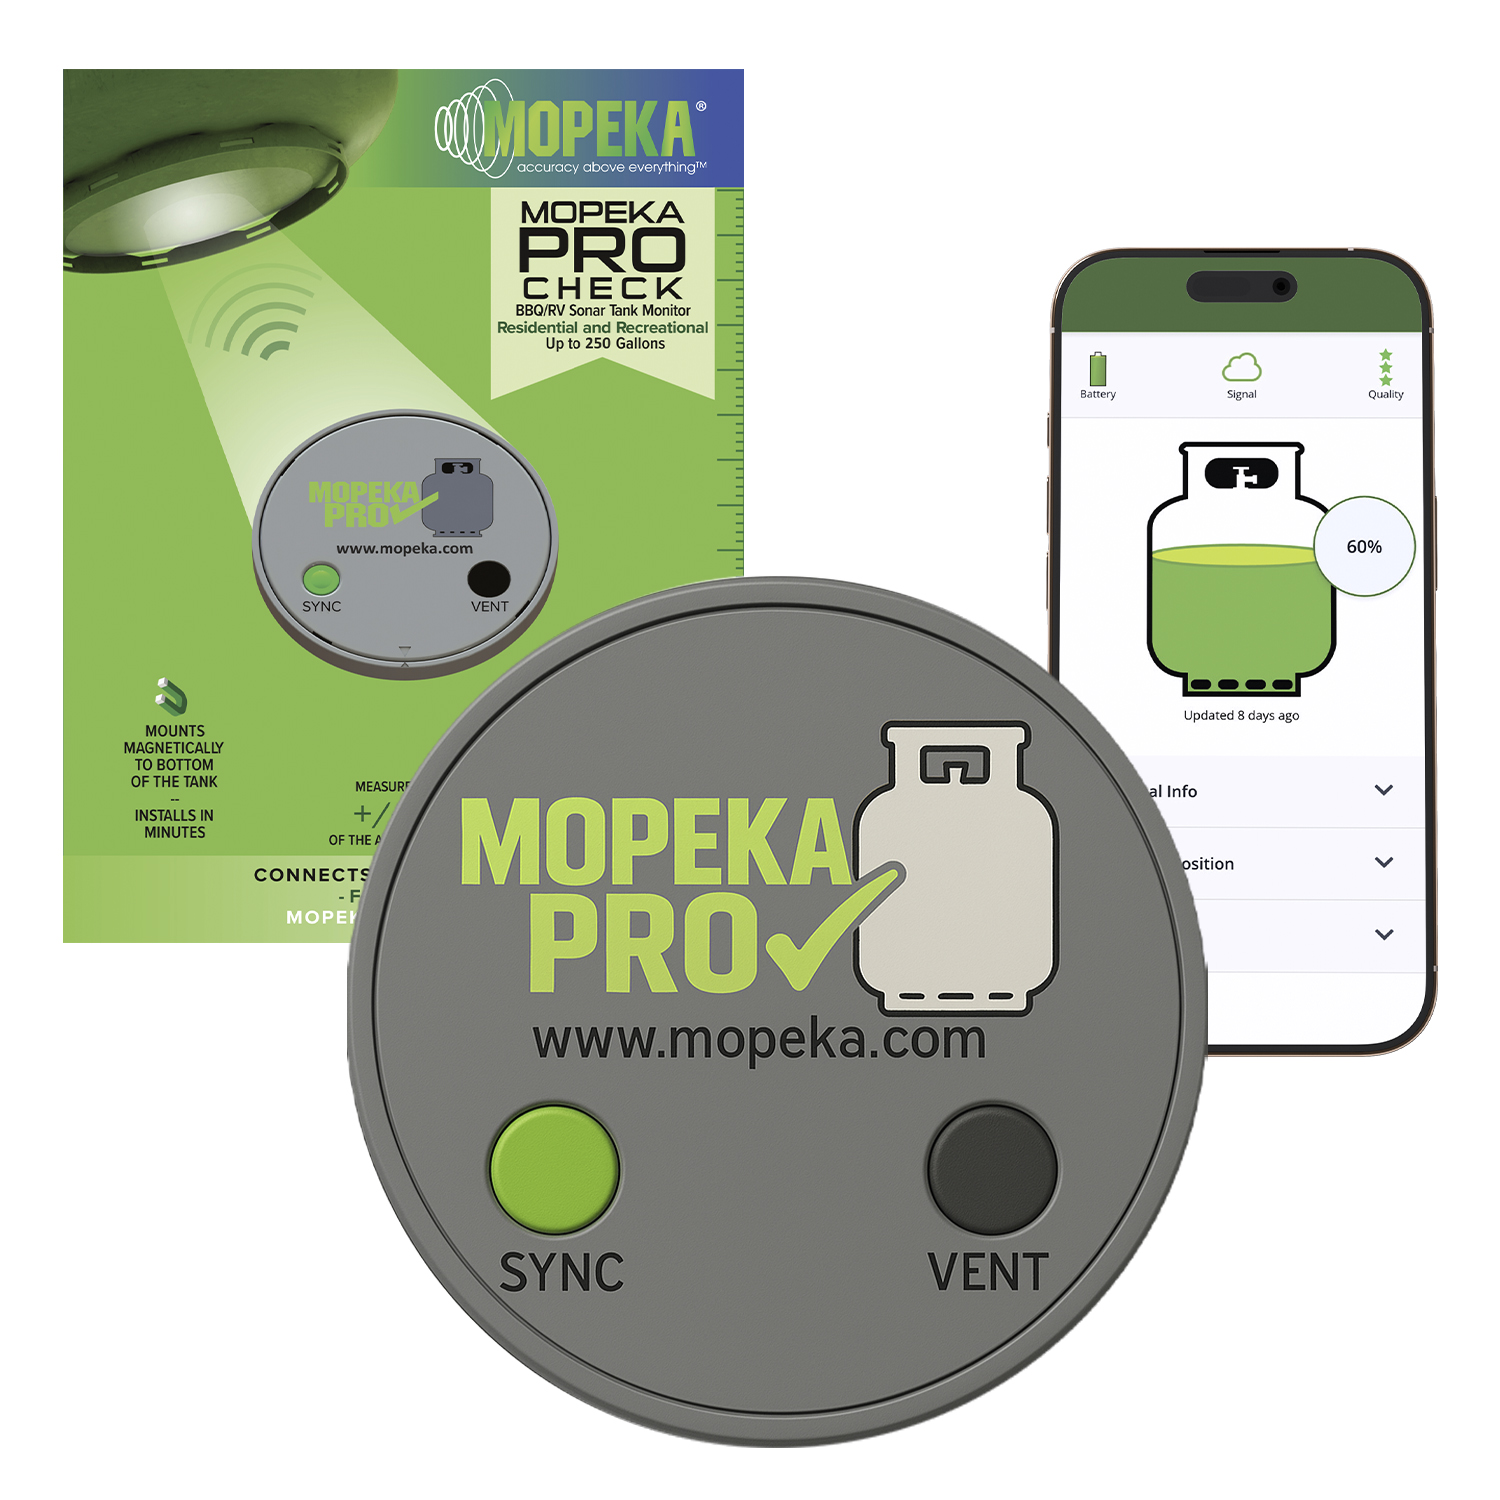
Image: Mopeka Products, https://mopeka.com
Mopeka made its name on propane bottles, but its Pro Check Universal sensors read poly holding tanks too: a small ultrasonic puck on the bottom exterior of the tank pings the liquid surface through the wall and reports to your phone over Bluetooth. Battery life on the current Pro Check Universal is rated around 3.5 years on a replaceable coin cell (Mopeka's earlier Pro Check claimed up to five), the puck attaches to the tank bottom with magnets or a mounting collar, and per-tank cost — roughly $70–80 for the Universal — runs meaningfully below a full SeeLevel retrofit.
Owner reports are encouraging with caveats: accuracy is solid through the middle of the range but can wander near empty and full, the puck needs a clean shot from the tank's lowest point (sludge above it is, once again, crud finding a way), and Bluetooth range means reading it at the rig unless you add Mopeka's gateway or pull the sensors into a broader system. Which brings us to —
Full integration — when tank levels become just another sensor
The quiet advantage of both upgrades is that they can feed a real monitoring setup instead of a dumb panel by the door. Mopeka's sensors in particular are a DIY-crowd favorite because they're readable by Home Assistant — tank levels on the same dashboard as temperature, batteries, and power, with alerts that reach your phone anywhere the rig has a connection. If you're thinking about watching the whole RV rather than just the tanks, start with our comparison of full monitoring systems — tank sensing is one line item in that decision.
The honorable low-tech fallbacks
A large, unbothered contingent of the RV community has solved this problem with a budget of zero:
- The flashlight method. Hold a flashlight down the (open, flushed) toilet and look. Exact, free, and rated G as long as you keep a grip on the flashlight.
- Counting flushes. Veterans know their rigs the way sailors know tides: "two people, four days, time to dump." Honestly more accurate than factory probes.
- The calendar. Dump every N days regardless. N is learned exactly once, the hard way.
We're a monitoring-obsessed bunch, and even we'll admit: a flashlight has never once read 13%.
FAQ
Why do my RV tank sensors read wrong? Because factory sensors are bare metal probes inside the tank, and anything conductive that sticks to them — wet toilet paper, grease film, soap scum, general crud — completes the circuit exactly like liquid does. A TP shred across a probe reads as "2/3 full" indefinitely. It's inherent to the conductance-probe design, not something you broke.
How do I clean RV tank sensors? Flush aggressively with a built-in tank flush or a wand/reverse-flush rinser until the water runs clear, then do a soak: fill the tank most of the way with water plus dish soap or a dedicated sensor cleaner, let it slosh through a travel day, and dump. Repeat for stubborn buildup. Expect the film to return with normal use — this is maintenance, not a cure.
Do ice cubes really clean RV tank sensors? No. In The Fit RV's clear-tank experiment, ice floated on the surface and melted without scrubbing anything. Any benefit people notice comes from driving with a partly full tank of water — the sloshing, not the ice.
Is the SeeLevel tank monitor worth it? If you're done with the probe-cleaning treadmill, it's the best-established upgrade: external adhesive senders, a true 0–100% percentage readout, nothing inside the tank to foul. Budget for a careful install — it's sensitive to bad 12V grounds, needs clearance from nearby metal, and heavy residue inside the tank wall can still skew it. Plastic tanks only.
Why does my black tank read full after dumping? Almost always toilet paper or waste residue bridging a probe (or, in SeeLevel systems, residue on the inside wall at the sender). Do a thorough flush-and-soak before suspecting the electronics — and if it happens constantly, switch to faster-dissolving toilet paper and use more water per flush.
Bottom line
Your factory tank sensors read wrong because they're conductive probes living in a tank of conductive crud — a design flaw, not a user error, and no chemical or bag of ice repeals it. Probe cleaning with real agitation works and must be repeated forever; the Geo Method is a decent soak wearing a lab coat; the ice cube trick is a campfire story with a receipt proving it false. When you're ready to stop scrubbing, SeeLevel II is the deserved default upgrade (mind your grounds), Mopeka is the clever budget path, and either one gets genuinely powerful when it feeds a real monitoring system instead of a row of lights you stopped believing years ago.
Until then: the flashlight never lies.
[Disclosure placeholder: once Waystation launches, add standard competitor-disclosure line per best-rv-monitoring-systems.]
Stay in the loop
Occasional updates from the road and the workbench — what we're learning, what we're building. No spam, easy out.
Draft preview — this form connects to the email service at launch.